
기존 굿잡 프로젝트에서는 단일 DB로 데이터를 저장하고 조회하는 방식을 처리했습니다. 해당 DB 구조는 일반적으로 간단한 프로젝트에서 자주 사용하는 구조입니다.
하지만 이러한 구조는 다음과 같은 문제가 있습니다.
- 하나의 DB로 쓰기와 조회를 동시에 처리하게 됩니다.
- DB 장애시 DB를 사용하는 모든 기능 동작이 멈추게 됩니다.
- 하나의 DB가 모든 부하를 감당하게 됩니다.
이러한 문제는 하나의 DB를 사용하기 때문에 생기는 문제입니다. 현재 굿잡에서 받는 트래픽에서 리플리케이션을 적용할만큼의 성능 이슈가 일어나지 않습니다.
하지만 리플리케이션은 트래픽 뿐만 아닌, 단일 장애점 방지, 백업의 이유도 있습니다. 이러한 이유로 리플리케이션을 적용하기로 결정했습니다.
리플리케이션은 다음과 같은 장점이 있습니다.
- 스케일 아웃: 여러 대의 DB를 늘려 성능 처리의 향상을 꾀할 수 있습니다.
- 데이터 백업: 다수의 DB에 데이터를 동기화시켜 저장해놓기 때문에 데이터 백업이 자연스럽게 됩니다.
- 단일 장애점 방지: 여러 대의 Replica DB를 두기 때문에 하나의 Replica DB가 고장나도 기능을 수행할 수 있습니다.
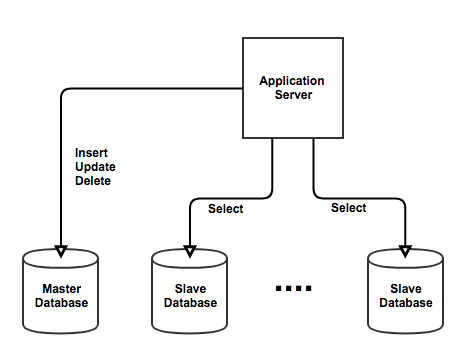
현재 프로젝트는 트래픽이 많지 않아 하나의 Source와 한개의 Replica로 구성하게 되었습니다.
AWS에서 RDB 읽기 전용 복제본 생성
우선 저는 현재 프로젝트에서 AWS RDB - MySQL을 사용하고 있습니다.
AWS에서는 읽기 전용 복제본을 쉽게 생성할 수 있도록 도와주고 있는데요.
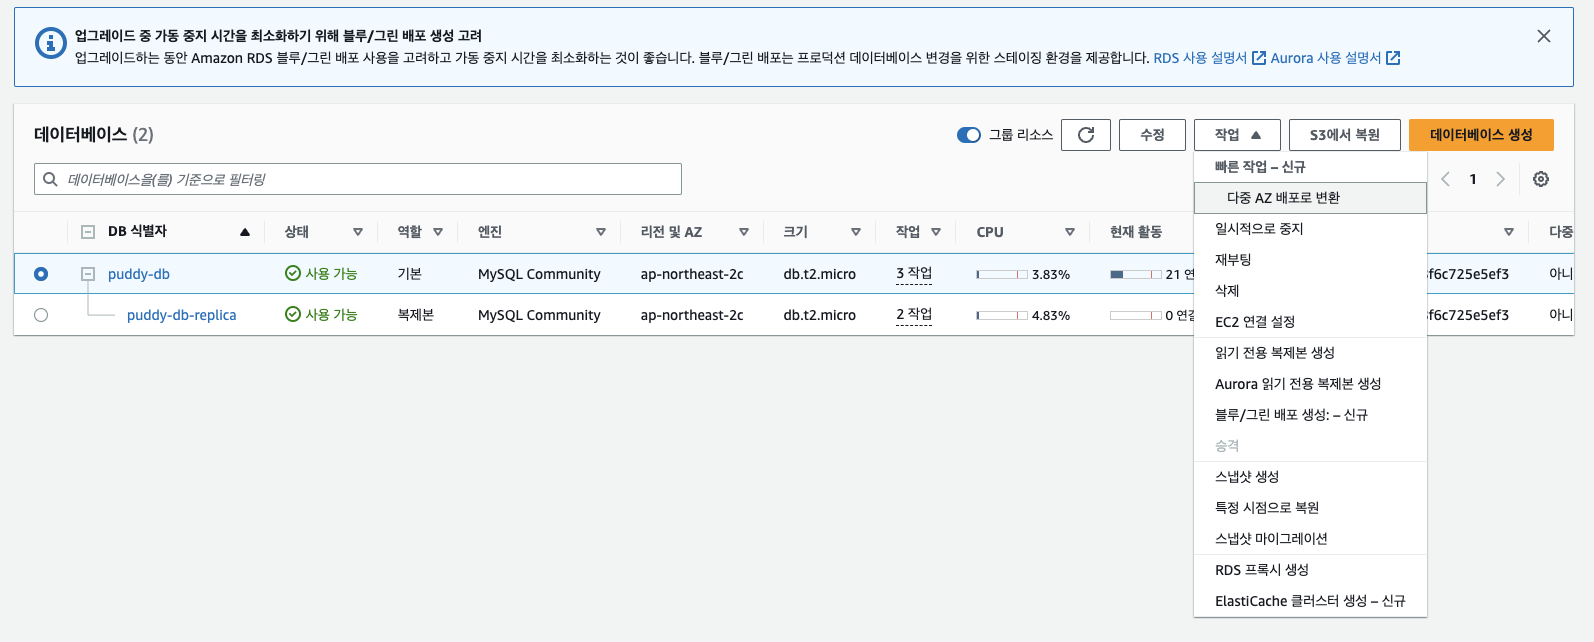
위와 같이 복제하고자 하는 DB를 선택하고 작업 탭에서 ‘읽기 전용 복제본 생성’을 누르면 됩니다.
저는 이미 생성해 놓았기 때문에 두번째에 replica라는 DB가 생성되어 있는 것입니다.
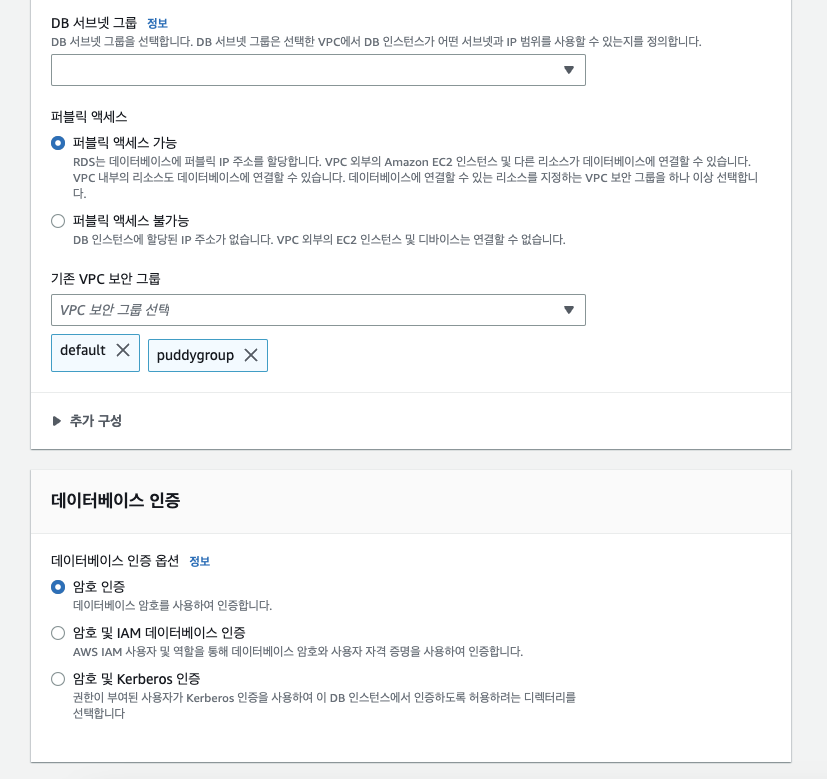
누르면 설정을 하는 페이지가 나오는데, 그 중 퍼블릭 액세스 허용을, 그리고 암호 인증을 통해 사용할 수 있도록 설정했습니다.
또한 저는 만일의 상황을 대비해서 삭제 방지를 활성화 했습니다.
Spring Boot 세팅
우선 build.gradle에 의존성을 추가해줍니다. 만약 MySQL 의존성이 없을 경우 MySQL 드라이버도 추가해주세요.
1
2
3
4
5
6
7
8
9
10
11
12
13
14
configurations {
    compileOnly {
        extendsFrom annotationProcessor
    }
}

dependencies {
    implementation 'org.springframework.boot:spring-boot-starter-web'
    compileOnly 'org.projectlombok:lombok'
    runtimeOnly 'mysql:mysql-connector-java'
    annotationProcessor 'org.springframework.boot:spring-boot-configuration-processor'
    annotationProcessor 'org.projectlombok:lombok'
    testImplementation 'org.springframework.boot:spring-boot-starter-test'
}
그리고 application.yml에 데이터 소스를 정의해야 하는데, 저는 이전에 DB 하나로 사용했기 때문에 아래와 같이 구성했습니다.
1
2
3
4
5
6
spring:
  datasource:
    driver-class-name: com.mysql.cj.jdbc.Driver
      username: 계정
      password: 계정 비밀번호
      url: jdbc:mysql://127.0.0.1:3306/goodjob
저희는 이제 Source DB와 Replica DB 여러개를 사용하기로 했기 때문에 아래와 같이 추가해줍니다.
1
2
3
4
5
6
7
8
9
10
11
12
spring:
  datasource:
    replication:
      driver-class-name: com.mysql.cj.jdbc.Driver
      username: 계정
      password: 계정 비밀번호
      write:
        name: write
        url: jdbc:mysql://RDS 소스 DB 엔드포인트:3306/goodjob
      reads:
        - name: read1
          url: jdbc:mysql://RDS 레플리카 DB 엔드포인트:3306/goodjob
만약 로컬에서는 레플리카를 사용하지 않고 DB 하나로 사용하고 싶다면, 위 두 내용을 둘 다 적어놓으시면 됩니다.
이제 위 설정 정보를 사용해서 데이터 소스를 설정해야합니다.
ReplicationDataSourceProperties
1
2
3
4
5
6
7
8
9
10
11
12
13
14
15
16
17
18
19
20
21
22
23
24
25
@Getter
@Setter
@Configuration
@ConfigurationProperties(prefix = "spring.datasource.replication")
public class ReplicationDataSourceProperties {
    private String username;
    private String password;
    private String driverClassName;
    private Write write;
    private List<Read> reads;

    @Getter
    @Setter
    public static class Write {
        private String name;
        private String url;
    }

    @Getter
    @Setter
    public static class Read {
        private String name;
        private String url;
    }
}
yml에 설정한 내용을 클래스와 매핑하도록 합니다.
ReplicationRoutingDataSource
1
2
3
4
5
6
7
8
9
10
11
12
13
14
15
16
17
18
19
20
21
22
public class ReplicationRoutingDataSource extends AbstractRoutingDataSource {
    private static final String READ = "read";
    private static final String WRITE = "write";
    private final ReadOnlyDataSourceCycle<String> readOnlyDataSourceCycle = new ReadOnlyDataSourceCycle<>();

    @Override
    public void setTargetDataSources(Map<Object, Object> targetDataSources) {
        super.setTargetDataSources(targetDataSources);
        List<String> readOnlyDataSourceLookupKeys = targetDataSources.keySet()
                .stream()
                .map(String::valueOf)
                .filter(lookupKey -> lookupKey.contains(READ)).toList();
        readOnlyDataSourceCycle.setReadOnlyDataSourceLookupKeys(readOnlyDataSourceLookupKeys);
    }

    @Override
    public Object determineCurrentLookupKey() {
        return TransactionSynchronizationManager.isCurrentTransactionReadOnly()
                ? readOnlyDataSourceCycle.getReadOnlyDataSourceLookupKey()
                : WRITE;
    }
}
Spring에서 제공하는 AbstractRoutingDataSource라는 클래스는 DataSource와 각 DataSource를 조회할 key로 구성할 수 있게끔 만들어줍니다.
이때 key는 Read와 Write입니다.
이제 Read용과 Write용 커넥션을 언제 얻어야 할지 구분을 해야하는데, 이는 @Transactional 어노테이션으로 구분이 가능합니다.
@Transactional에 readOnly 속성이 true로 지정되면 Read 데이터베이스 커넥션을 얻고 false(기본값)면 Write 데이터베이스 커넥션을 얻게 됩니다.
ReadOnlyDataSourceCycle
1
2
3
4
5
6
7
8
9
10
11
12
13
14
15
public class ReadOnlyDataSourceCycle<T> {
    private List<T> readOnlyDataSourceLookupKeys;
    private int index = 0;

    public void setReadOnlyDataSourceLookupKeys(List<T> readOnlyDataSourceLookupKeys) {
        this.readOnlyDataSourceLookupKeys = readOnlyDataSourceLookupKeys;
    }

    public T getReadOnlyDataSourceLookupKey() {
        if (index + 1 >= readOnlyDataSourceLookupKeys.size()) {
            index = -1;
        }
        return readOnlyDataSourceLookupKeys.get(++index);
    }
}
아까 yml파일에서 reads에서 리스트 형식으로 Replica DB 정보를 작성했는데, 이것이 여러개가 될 경우 위 클래스를 통해 로드밸런싱을 해줍니다.
ReplicationDataSourceConfiguration
1
2
3
4
5
6
7
8
9
10
11
12
13
14
15
16
17
18
19
20
21
22
23
24
25
26
27
28
29
30
31
32
33
34
35
36
37
@Configuration
@RequiredArgsConstructor
public class ReplicationDataSourceConfiguration {
    private final ReplicationDataSourceProperties replicationDataSourceProperties;

    @Bean
    public DataSource routingDataSource() {
        ReplicationRoutingDataSource replicationRoutingDataSource = new ReplicationRoutingDataSource();

        ReplicationDataSourceProperties.Write write = replicationDataSourceProperties.getWrite();
        DataSource writeDataSource = createDataSource(write.getUrl());

        Map<Object, Object> dataSourceMap = new HashMap<>();
        dataSourceMap.put(write.getName(), writeDataSource);

        List<ReplicationDataSourceProperties.Read> reads = replicationDataSourceProperties.getReads();
        for (ReplicationDataSourceProperties.Read read : reads) {
            dataSourceMap.put(read.getName(), createDataSource(read.getUrl()));
        }

        replicationRoutingDataSource.setDefaultTargetDataSource(writeDataSource);
        replicationRoutingDataSource.setTargetDataSources(dataSourceMap);
        replicationRoutingDataSource.afterPropertiesSet();

        return new LazyConnectionDataSourceProxy(replicationRoutingDataSource);
    }

    private DataSource createDataSource(String url) {
        HikariDataSource hikariDataSource = new HikariDataSource();
        hikariDataSource.setDriverClassName(replicationDataSourceProperties.getDriverClassName());
        hikariDataSource.setUsername(replicationDataSourceProperties.getUsername());
        hikariDataSource.setPassword(replicationDataSourceProperties.getPassword());
        hikariDataSource.setJdbcUrl(url);

        return hikariDataSource;
    }
}
yml에 정의된 DB 접속 정보를 읽어서 Write DataSource, Read DataSource를 생성 후 Spring에서 라우팅을 할 수 있게 끔 설정하는 클래스입니다.
기본적으로 Lazy로 동작하며, 항상 두 DB에 대한 커넥션을 유지하는 것이 아니라 필요할 때까지 커넥션을 지연시키도록 동작합니다.
LazyConnectionDataSourceProxy에 대한 것을 찾아보시면 좋을 것 같습니다.
이제 설정은 다 끝났습니다.
만약 그래도 연결이 안된다면
읽기 전용 복제본을 생성했을때 보안 그룹 이슈일 가능성이 큽니다.
읽기 전용 복제본의 인바운드 규칙이 sg-XXXXX처럼 되어있다면,
삭제하고 아래와 같이 설정해줍니다.

커넥션 테스트
이제 테스트 해봅시다.
@Transactional 어노테이션 옵션을 통해 분기하기 때문에 아래와 같이 구현해줍니다.
1
2
3
4
5
6
7
8
9
10
11
12
13
14
15
16
17
18
19
20
21
22
23
24
@Slf4j
@RequiredArgsConstructor
@Service
public class ReplicationService {
    private final DataSource lazyDataSource;

    @Transactional(readOnly = true)
    public void read() {
        try (Connection conn = lazyDataSource.getConnection()) {
            log.info("read url : {}", conn.getMetaData().getURL());
        } catch (Exception e) {
            log.error(e.getMessage(), e);
        }
    }

    @Transactional
    public void write() {
        try (Connection conn = lazyDataSource.getConnection()) {
            log.info("write url : {}", conn.getMetaData().getURL());
        } catch (Exception e) {
            log.error(e.getMessage(), e);
        }
    }
}
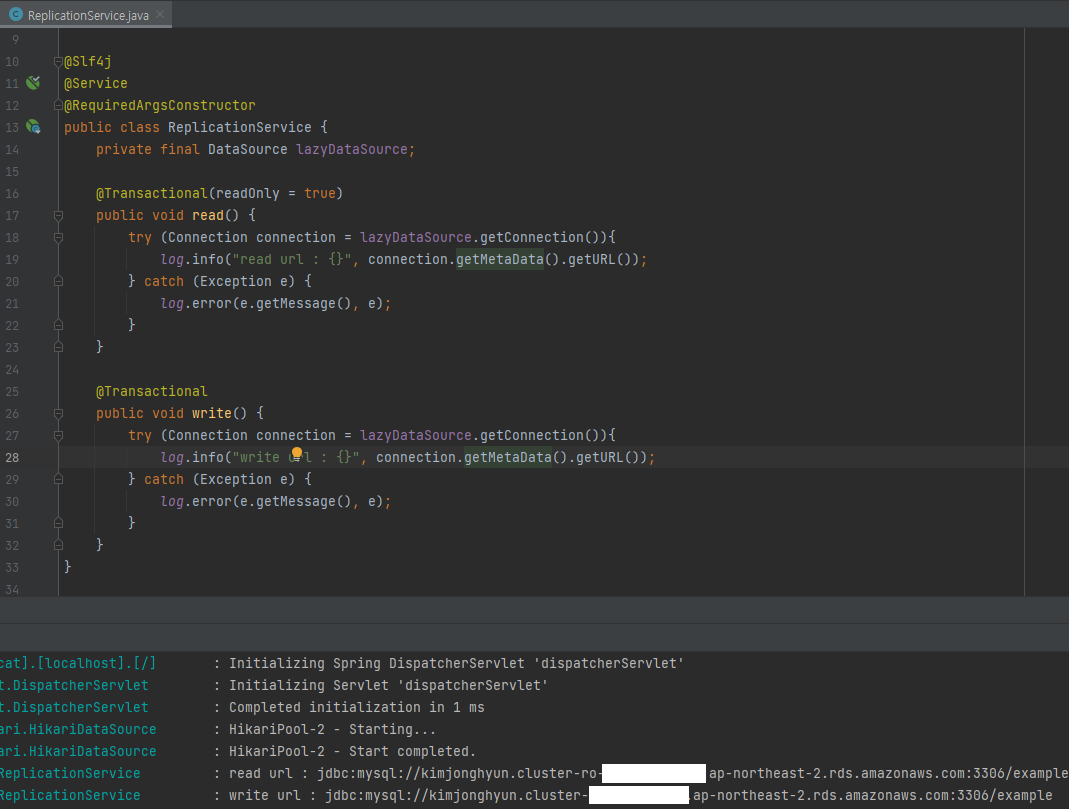
위와 같이 읽기, 쓰기의 DB URL이 다름을 확인할 수 있습니다.